Angular Control Flow
A new modern way of writing ifs, if-else, switch-cases, and even loops in Angular templates!

Kevin Kreuzer
@nivekcode
Oct 24, 2023
5 min read

(📸 by Javier Martínez)
Angular 17 is around the corner with a brand new template feature named control flow. The control flow is a new way of writing if statements, if-else statements, switch-case statements and for loops.
Additionally, Angular 17 will introduce “Deferable Views,” an exciting feature which we will cover in another blog post. Subscribe to our newsletter to not miss it!{:target="_blank"}
Let's dive into the future of Angular and explore how we'll be crafting our if-else, switch-case, and for loops. We'll begin with the straightforward yet fundamental example: the humble if condition.
The @if conditions
Up until now, Angular has allowed us to create simple if statements with the usage of the NgIf directive.
<div *ngIf="condition">Content</div>
To compile this code, we had to add the NgIf directive to our components imports array. The complete component code would look like this.
@Component({
  standalone: true,
  template: `<div *ngIf="condition">Content</div>`,
  imports: [NgIf],
})
export class MyComponent {}
Great, now let’s explore how we can shake things up in Angular 17 by using the fresh and exciting control flow syntax to rewrite this code.
@if (condition) {
  <div>Content</div>
}
Indeed, the syntax is strikingly similar to a regular JavaScript function. The only noticeable difference is that little @ symbol at the start of our if statement.
Okay, pretty easy. What about an if-else?
If you are not familiar with the syntax yet, just ask yourself, how would I write an
if/elsein JavaScript and then add prefix the keywords with an@symbol.
@if (streamingService === 'Netflix'){
  <div>Peaky Blinders</div>
} @else {
  <div>Ted Lasso</div>
}
🤩 Straight forward. Just prefix the if and else keywords with an @ and return templates in the function bodies instead of log statements.
Okay, wow, an if-else statement. Why are you so excited? Well, currently we would have to write the following to achieve the same.
<div *ngIf="streamingService === 'Netflix'; else appleTVShow">
  Peaky Blinders
</div>

<ng-template #appleTVShow>
  <div>Ted Lasso</div>
</ng-template>
To me, the new approach dramatically improves readability. Also, it is way easier to teach since it is very close to the JavaScript syntax.
Which one do you prefer? Which one do you find more readable? Let us know in the comments.
That’s all we need to know regarding control flow and if-else, on to switch-case statements.
The @switch case
The Switch-Case statement allows you to evaluate an expression and execute different blocks of code based on the matched case, making it a useful tool for handling multiple branching conditions.
In the current Angular version, we were able to write a switch-case statement by adding the following directives to our components or modules imports array: NgSwitch, NgSwitchCase and NgSwitchDefault. The HTML code then looks like this:
<div [ngSwitch]="streamingService">
  <div *ngSwitchCase="'AppleTV'">Ted Lasso</div>
  <div *ngSwitchCase="'Disney+'">Mandalorian</div>
  <div *ngSwitchDefault>Peaky Blinders</div>
</div>
Let’s rewrite this to the new control flow syntax.
@switch(streamingService) {
  @case ('Disney+') {
    <div>'Mandalorian'</div>
  } @case ('AppleTV') {
    <div>'Ted Lasso'</div>
  } @default {
    <div>'Peaky Blinders'</div>
  }
}
Again, this code is close to the JavaScript version but instead of using
:we use curly brackets for our case statements.
Great, who’s ready to dive into loops?
The @for loops
Loops play a crucial role in virtually every application because they serve as fundamental building blocks for working with lists and data. Today Angular provides us the ngFor directive.
<ul>
  <li *ngFor="let streamingService of streamingServices">
    {{streamingService}}
  </li>
</ul>
Let’s take a look at how we write such a loop inside an Angular template using the new control flow syntax.
<ul>
  @for (streamingService of streamingServices; track streamingService) {
    <li>{{streamingService}}</li>
  }
</ul>
We can see some differences here. Firstly, we’re missing the let keyword in front of the variable definition, and secondly, we’re introducing the track function.
New better "track"
Does track ring a bell? It might remind you of the optional trackBy function we’ve been using with ngFor so far.
In Angular, the
trackByfunction is used with thengFordirective to optimize rendering of lists. It assigns a unique identifier to each item in the list, allowing Angular to efficiently update and modify individual items without re-rendering the entire list. This improves performance, especially with large lists.
☝️ Did you ever experience performance issues with bigger lists? Well, maybe it has to do with not using the
trackByfunction. In a performance research, the Angular team found out thatNgForloops over immutable data withouttrackByis one of the most common causes of performance issues across Angular applications.
Due to the risk of performance issues, the track function is now required for for loops.
The nice thing about track is that we can now write our whole expression inline and there's no need for a dedicated function in our template.
@for (product of products; track product.id) {
 {{ product.title }}
}
It’s still possible to invoke
trackByfunction via track. This will mainly be used for migration purposes.
@for (product of products; track productId($index, product)) {
  {{ product.title}}
}
Implicit variables
In the new control flow syntax the following variables will be available within a for row view.
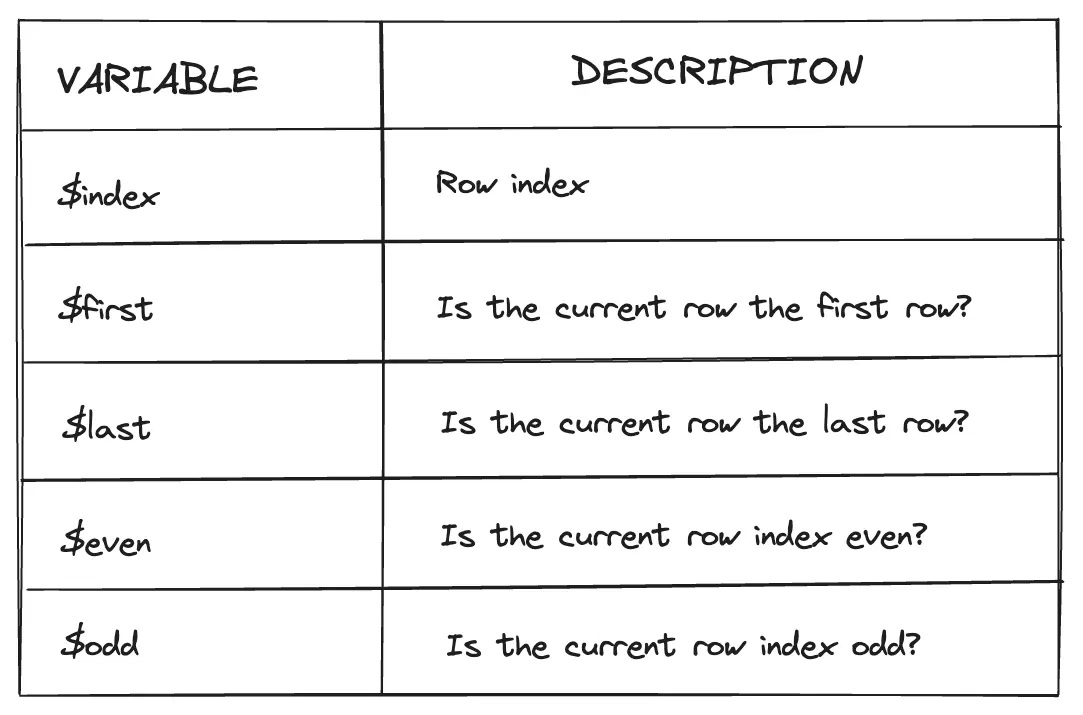
To access those variables we have to use the let keyword to assign them to a variable of our choice.
<ul>
  @for (service of streamingServices; track service; let i =
    $index; let first = $first; let last = $last; let even = $even; let odd = $odd
  ) {
    <li>{{i}} {{first}} {{last}} {{even}} {{odd}}</li>
  }
</ul>
Exciting, isn’t it? But that’s not all, there's a brand new feature, an @empty block.
Empty block
The use of an @empty block provides us with the ability to render an element even when the list is empty.
Let’s say we have a list where we display all the streaming services a user is currently subscribed to. If the user doesn’t have any streaming service subscriptions we display a div with a message. This is a perfect use case for the @empty block.
@for (streamingService of streamingServices; track stramingService) {
  <div>{{ streamingService }}</div>
} @placeholder {
  <div>No streaming services available</div>
}
Automatic migration
If you, like me, are a fan of the new, more readable syntax, you might just feel like giving your codebase a nice makeover to adopt this fresh approach to control flow. But that could result in a lot of work, since ngIf and ngFor statements are used all over your application.
But don’t worry Angular provides an epic migration command that will migrate our application to the new control flow syntax.
ng g @angular/core:control-flow
In conclusion, the new control flow syntax is a change that not only improves the readability of our code but also makes it more intuitive and elegant. As a fan of these enhancements, I truly believe that they are a step in the right direction, making our codebases cleaner and more efficient.
So, don’t forget to let us know your thoughts in the comments, as we’re eager to hear your perspective on this exciting development. Happy coding!
Further resources
If you’re curious to learn more about the awesome new control flow, feel free to check out my Stream VOD and take a peek at the introduction video showcasing this nifty feature. It’s a fun way to get the lowdown on what the control flow is all about!
Do you enjoy the theme of the code preview? Explore our brand new theme plugin
Skol - the ultimate IDE theme

Northern lights feeling straight to your IDE. A simple but powerful dark theme that looks great and relaxes your eyes.
Build smarter UIs with Angular + AI
Angular + AI Video Course
A hands-on course showing how to integrate AI into Angular apps using Hash Brown to build intelligent, reactive UIs.
Learn streaming chat, tool calling, generative UI, structured outputs, and more — step by step.
Do you enjoy the content and would like to learn more about how to ensure long term maintainability of your Angular application?
Angular Enterprise Architecture eBook

Learn how to architect a new or existing enterprise grade Angular application with a bulletproof tooling based automated architecture validation.
This will ensure that Your project stays maintainable, extendable and therefore with high delivery velocity over the whole project lifetime!
Do you enjoy the content and want to master Angular's brand new Signal Forms?
Angular Signal Forms: Hands-On Masterclass
Master Angular's brand new Signal-Forms through 12 progressive chapters with theory and hands-on labs.
Learn form basics, validators, custom controls, subforms, migration strategies, and more!
Get notified
about new blog posts
Sign up for Angular Experts Content Updates & News and you'll get notified whenever we release a new blog posts about Angular, Ngrx, RxJs or other interesting Frontend topics!
We will never share your email with anyone else and you can unsubscribe at any time!
Responses & comments
Do not hesitate to ask questions and share your own experience and perspective with the topic
You might also like
Check out following blog posts from Angular Experts to learn even more about related topics like Modern Angular !
Angular Signal Forms: The Missing Create/Edit Pattern
Learn a practical Angular Signal Forms pattern for create and edit flows, with route-based mode, edit data loading, linkedSignal prefilling, submit branching, and validation context.
Kevin Kreuzer
@nivekcode
Jun 1, 2026
6 min read

Angular Signal Forms Essentials
Understand the core concepts behind modern Angular Forms. Learn how to create Signal Forms, wire them up in templates, use built-in and custom validators, handle cross-field validation, submit forms, and more.
Kevin Kreuzer
@nivekcode
Feb 14, 2026
12 min read

Angular Signal Forms Config
Learn how to configure Angular Signal Forms to bring back the classic CSS state classes (like ng-valid, ng-invalid, and ng-touched)—either for backward compatibility with existing styles or to unlock new customization, like emitting your own tailored state classes for advanced styling.
Kevin Kreuzer
@nivekcode
Jan 24, 2026
4 min read
Empower your team with our extensive experience
Angular Experts have spent many years consulting with enterprises and startups alike, leading workshops and tutorials, and maintaining rich open source resources. We take great pride in our experience in modern front-end and would be thrilled to help your business boom
